Description
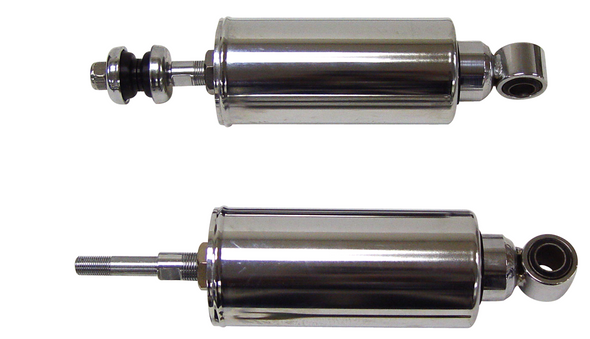
Weight: 12.10lb Chrome plated adjustable shocks on bike. Sold as a Pair. Shock length can be adjusted to raise the seat height 1 - 2 " or lower it 1 & 1 /2 " Adjustable spring preload. Springs can be adjusted using a spanner wrench (not included). If you do not have one you can purchase tool part #29224 which can be used to adjust them.
Shock length is 11" Made by V-FACTOR
Fits: Harley Softail 1989-1999 & most custom Softail style frames
- Heritage Softail - FLST • 1989-1990
- Heritage Softail Classic - FLSTC • 1989-1999
- Heritage Softail Nostalgia - FLSTN • 1993
- Heritage Softail Special - FLSTN • 1994-1996
- Heritage Softail Springer - FLSTS • 1997-1999
- Softail - FXST • 1989-1993
- Softail Custom - FXSTC 1989-1999
- Softail Fat Boy - FLSTF 1990-1999
- Softail Night Train - FXSTB 1999
- Softail Springer - FXSTS 1989-1999
- Softail Springer Bad Boy - FXSTSB 1995-1997
- Softail Standard - FXST 1999
1) Raise the bike up so the rear tire is off the ground. (The more clearance you have the easier it is.) Don't forget to strap the bike down. You don't want it falling on you while your wrenching underneath it.
2) Loosen the jam nut all the way out. It is a 1-11/16" nut. If it doesn't want to loosen easily (which is often the case), soak it in some penetrating lube.
3) With a spanner wrench (HD p/n 94448-82B) turn the adjuster plate counter-clockwise (so the shock housing moves towards the front of the bike) until its up against the jam nut.
4) Then take a light colored paint pen, or a piece of duck tape, and mark the 6 o'clock position on the adjuster plate to use as a reference point when doing your adjustment. Don't worry if they're not in exactly the same position on both shocks.
5) With the spanner wrench, turn the adjuster plate clockwise no more then 4 complete turns by counting how many times the mark from step 4 crosses the 6 o'clock position. 0 turns is the stiffest setting, and 4 turns is the softest setting.
6) While holding the adjuster plate in place with the spanner wrench, tighten the jam nut up against the adjuster plate by turning the nut clockwise.
6) Now repeat the exact same process on the other shock. The key is to adjust both shocks equally.
As a general rule of thumb:
- 4 turns for load <= 180 lbs
- 3 turns for 180lbs < load <= 235lbs
- 2 turns for 235lbs < load <= 300lbs
- 1 turn for 300lbs < load <= 375lbs
- 0 turns for 375 < load
Warranty
100% Money Back Guarantee!
Delivery & Returns
Free Standard Shipping on Orders in the USA
90-Day Easy Returns with Zero re-stocking fees


